Friday, 29 August 2014

Tor in Kali Linux

Installing Tor in Kali Linux



How to install Tor - logo - blackMORE Ops

What is Tor?

Tor is free software and an open network that helps you defend against traffic analysis, a form of network surveillance that threatens personal freedom and privacy, confidential business activities and relationships, and state security. This guide guides your through installing tor in Kali Linux.

Why anonymity matters?

Tor protects you by bouncing your communications around a distributed network of relays run by volunteers all around the world: it prevents somebody watching your Internet connection from learning what sites you visit, and it prevents the sites you visit from learning your physical location.
[Source: https://www.torproject.org/]

Installing Tor in Kali Linux:


Step 1: Getting tor service ready

There are 3 ways of installing Tor service in Kali Linux. You can install Tor by following any of these options:

Option #1: Install Tor from Kali Repository

Tor is available in Kali repository, to install it directly from the repository open your Terminal and type this:
apt-get install tor
If no error occurs, follow the second step.

Option #2: Install Tor from Debian Wheezy Repository

If you can’t install Tor using the first method then you may try this option. In this way we are going to add the official Tor repository according to our Debian distribution. Not to be confused, Kali is actually based on Debian and it uses the package management from “Wheezy”. So we are going to use “Wheezy” as our distribution.
Now open your terminal and follow these steps:

Step #1: Add repo to sources.list file
Lets add the distribution in the list by opening the sources.list file
leafpad /etc/apt/sources.list
Now add the following line at the bottom of the file,
deb http://deb.torproject.org/torproject.org wheezy main

Step #2: Add GPG Keys
Now we need to add the gpg key used to sign the packages by running the following commands:
gpg --keyserver keys.gnupg.net --recv 886DDD89
gpg --export A3C4F0F979CAA22CDBA8F512EE8CBC9E886DDD89 | apt-key add -

Step #3: Update package lists
Lets refresh our sources:
apt-get update

Step #4: Install singing keys
Now, before installing the Tor we must add the signing key,
apt-get install deb.torproject.org-keyring

Step #5: Install Tor from Debian repository
Finally,
apt-get install tor
Now Tor should be installed!
If no error occurs, follow the second step.

Option #3: Install Tor from development branch

If you are an advanced user and you want to install Tor using the development branch then this method is for you.

Step #1: Add Tor project repository to sources.list
You need to add a different set of lines to your /etc/apt/sources.list file:
deb http://deb.torproject.org/torproject.org wheezy main
deb http://deb.torproject.org/torproject.org tor-experimental-0.2.5.x- wheezy main

Step #2: Add GPG keys, keyring and install Tor
Then run the following commands at your command prompt:
gpg --keyserver keys.gnupg.net --recv 886DDD89
gpg --export A3C4F0F979CAA22CDBA8F512EE8CBC9E886DDD89 | apt-key add -
apt-get update
apt-get install tor deb.torproject.org-keyring
Now Tor should be installed!
If no error occurs, follow the second step.
Note: This release will provide you more features but it contains bugs too.

Option #4: Build and Install Tor from sources

If you want to build your own debs from source you must first add an appropriate deb-src line to sources.list.
deb-src http://deb.torproject.org/torproject.org wheezy main
deb-src http://deb.torproject.org/torproject.org tor-experimental-0.2.5.x--wheezy main
You also need to install the necessary packages to build your own debs and the packages needed to build Tor:
apt-get install build-essential fakeroot devscripts
apt-get build-dep tor
Then you can build Tor in ~/debian-packages:
mkdir ~/debian-packages; cd ~/debian-packages
apt-get source tor
cd tor-*
debuild -rfakeroot -uc -us
cd ..
Now you can install the new package:
dpkg -i tor_*.deb

Step #2: Downloading and Running Tor bundle

Download the Tor Bundle from here,
https://www.torproject.org/projects/torbrowser.html.en
Download the architecture-appropriate file above, save it somewhere, then run one of the following two commands to extract the package archive:
tar -xvzf tor-browser-gnu-linux-i686-2.3.25-15-dev-LANG.tar.gz
or (for the 64-bit version):
tar -xvzf tor-browser-gnu-linux-x86_64-2.3.25-16-dev-LANG.tar.gz
(where LANG is the language listed in the filename).
Once that’s done, switch to the Tor browser directory by running:
cd tor-browser_LANG
(whereLANG is the language listed in the filename).
To run the Tor Browser Bundle, execute the start-tor-browser script:
./start-tor-browser
This will launch Vidalia and once that connects to Tor, it will launch Firefox.
Note: Do not unpack or run TBB as root. (though in Kali Linux, it doesn’t make any differences)

Thanks for reading. Please share with friends.
Vulnerabilities for Any Website Using Nikto [kali linux]

How to Find Vulnerabilities for

AnyWebsite Using Nikto

Before attacking any website, it's critical to do good reconnaissance. A few minutes of recon can save you hours on a hack. Simply trying various attacks without first finding which attacks the site is vulnerable is pure foolishness.
There are a number of tools and applications to find vulnerabilities in websites, but one of the simplest (and one of my favorites) is nikto.
This small and simple tool examines a website and reports back to you the potential vulnerabilities that it found that you could use to exploit or hack the site. In addition, it's one of the most widely used website vulnerabilities tools in the industry and in many circles considered the industry standard.
Although this tool is extremely useful and effective, it is NOT stealthy. Any website with an IDS or other security measures in place will detect that you are scanning it. Originally designed for security testing, it was never meant to be stealthy.

Step 1: Fire Up Kali & Open Nikto

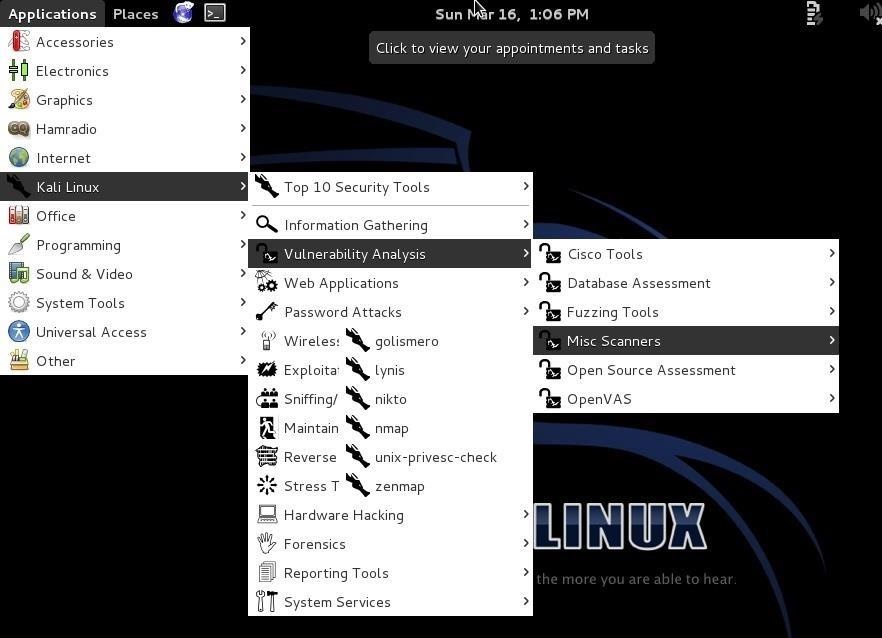
Let's fire up Kali and get started with nikto. Once we have Kali up and running, go to Kali Linux -> Vulnerability Analysis -> Misc Scanners -> nikto, like in the screenshot below.
Image via wonderhowto.com Although there are many options in using nikto, we will limit ourselves here to the basic syntax, such as this:
  • nikto -h <IP or hostname>

Step 2: Scan the Web Server

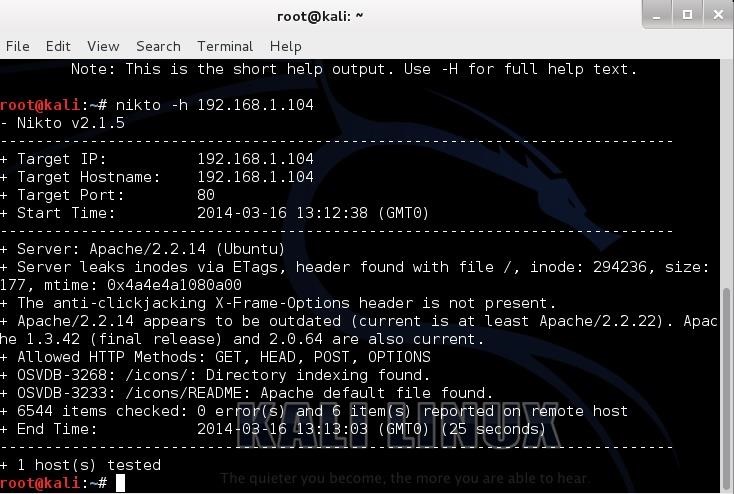
Let's start with a safe web server on our own network. In this case, I have started the http service on another machine on my network. There is not a website hosted by this machine, just the web server. Let's scan it for vulnerabilities by typing:
  • nikto -h 192.168.1.104
Nikto responds with a lot of information, as you can see below.
First, it tells us the server is Apache 2.2.14, probably on Ubuntu. It nailed this info and gives up more information on other potential vulnerabilities on this web server.
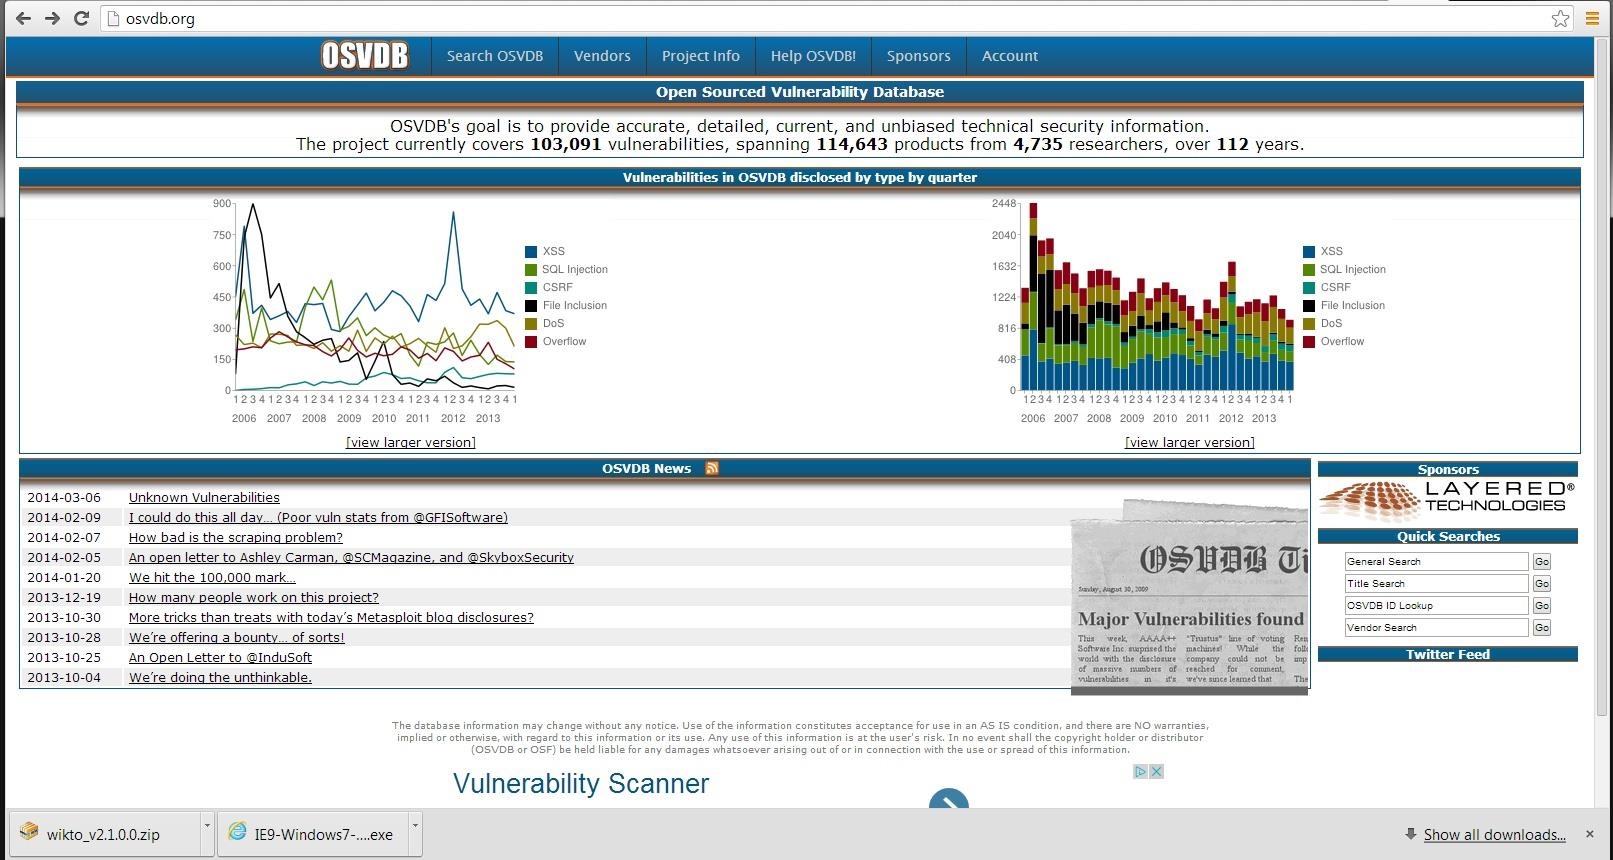
Note near the bottom that it identifies some vulnerabilities with the OSVDB prefix. This is the Open Source Vulnerability Database. This is a database maintained of known vulnerabilities at www.osvdb.org, in addition to other databases I covered, such as SecurityFocus and Microsoft's Technet.

Step 3: Scan the Site

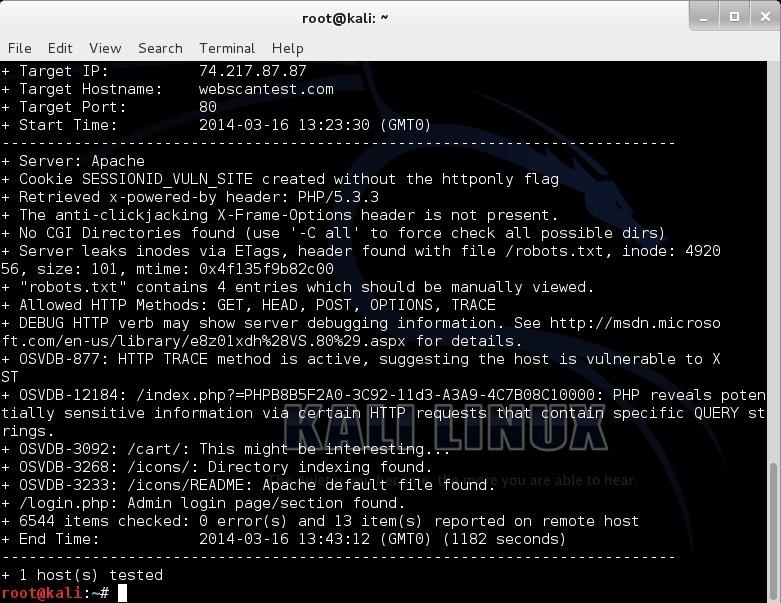
Let's try another site.  Let's see what nikto can tell us about this site.
  • nikto -h webscantest.com
Once again, it identifies the server (Apache) and then proceeds to identify numerous potential vulnerabilities pre-fixed with OSVDB. We can take a look at that website at www.osvdb.org to learn more about these vulnerabilities.
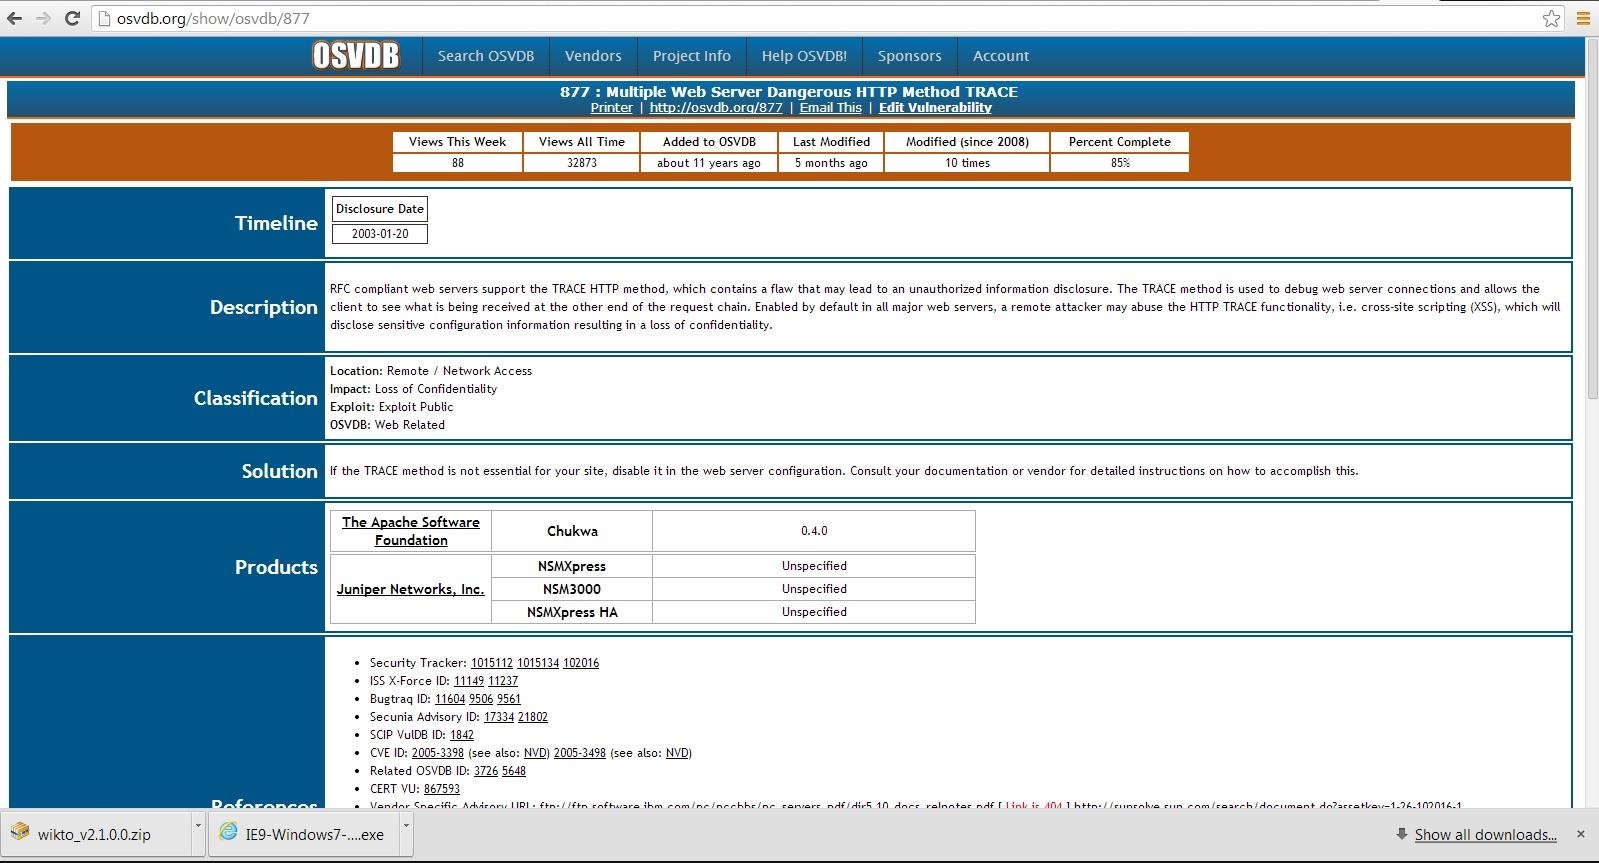
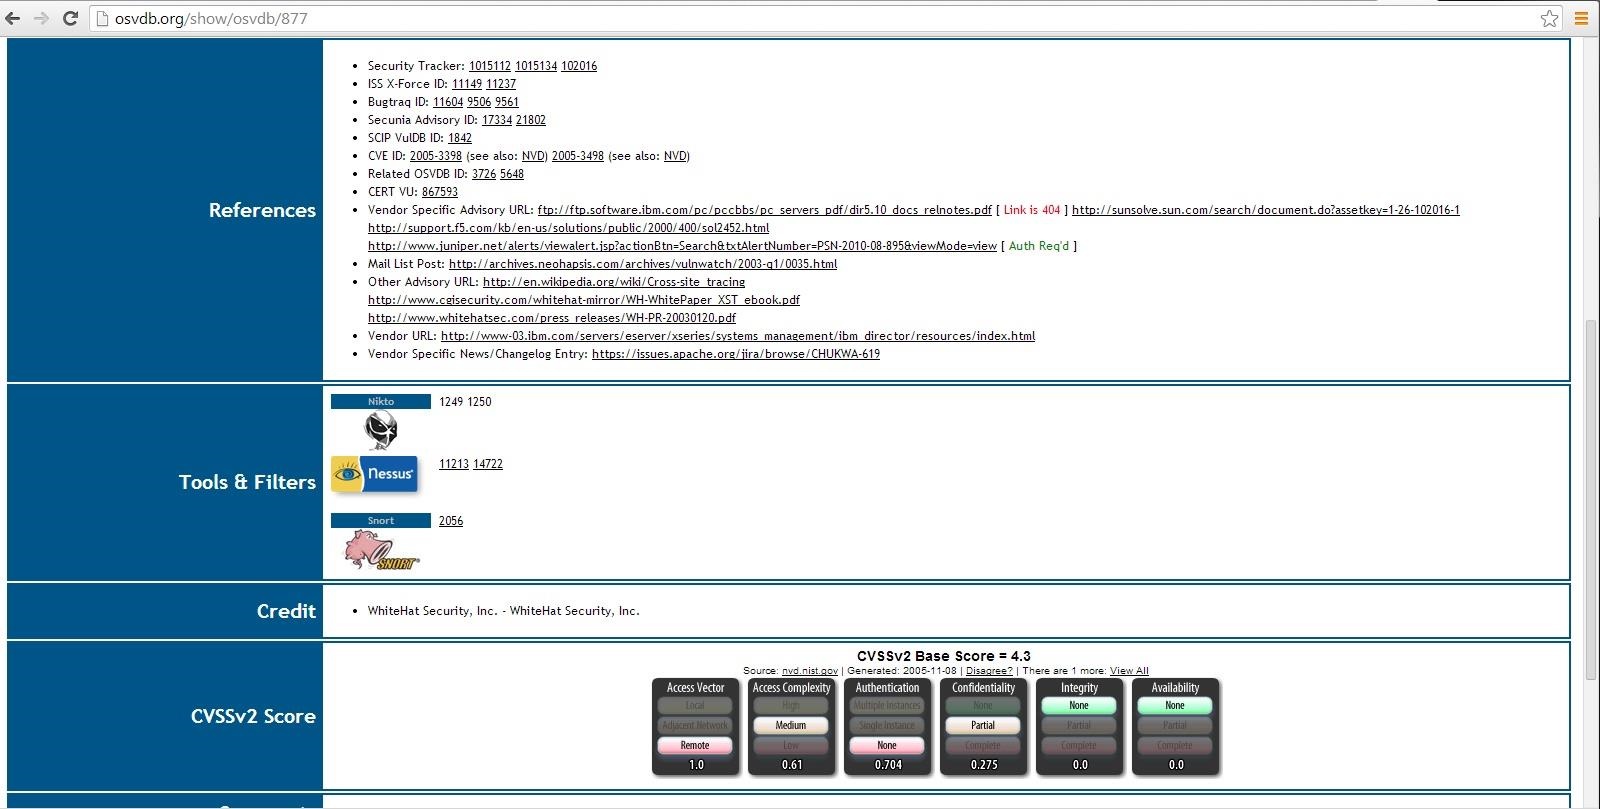
Now, let's use this site to find information on one of the vulnerabilities identified by nikto as OSVDB-877. We can put that reference number into the search function and it retrieves the following page.
Note, in lower half of this page there are cross-references to the various information sources about this vulnerability, as well as references to tools and filters such as Nikto, Nessus, and Snort.

Scan WonderHowTo

Let's scan a few more sites and see what it can tell us about these sites. Let's see what we can find out about our own website, www.wonderhowto.com.
  • nikto -h wonderhowto.com
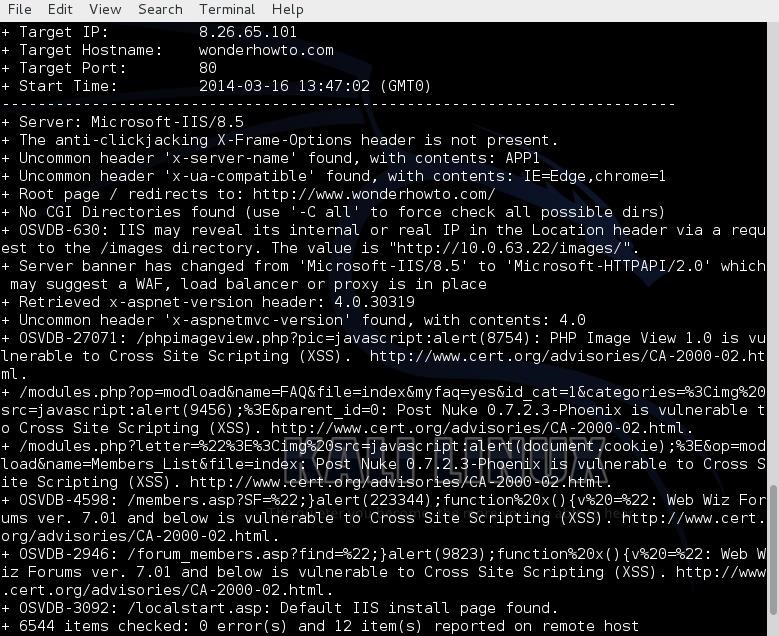
As you can see, it tells us that WonderHowTo is using Microsoft's IIS 8.5 as a web server and then lists numerous potential vulnerabilities.
However, any attempt to exploit the vulnerabilities listed will reveal that they're all false-positives, as WonderHowTo simply returns a harmless 404 page. This is because WonderHowTo is not built on php or asp as the noted exploits expect.
False positives like this can appear because the scan does not actually execute each of the possible vulnerabilities, but rather scans to see if the server responds without error to known exploitable URLs.

Scan Facebook
lol

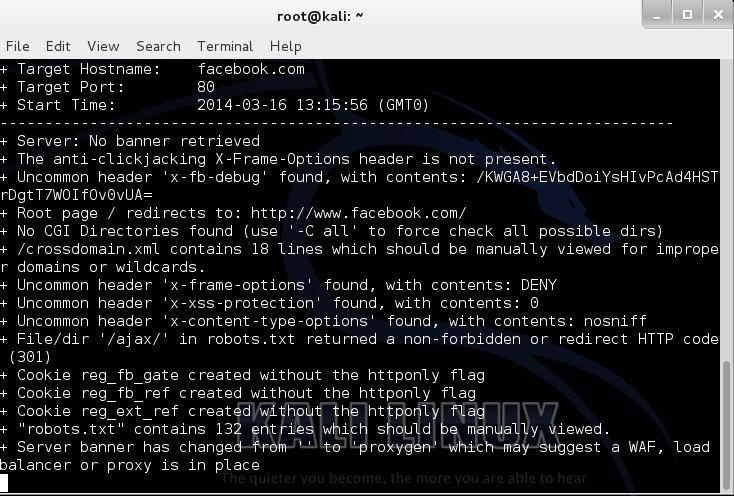
Finally, lets point nikto at www.facebook.com.
  • nikto -h facebook.com
As you can see, Facebook is tightly secured with few vulnerabilities. As you can imagine, if Facebook weren't secure, every script-kiddie on the planet would be hacking it to see who his true love is chatting with online.


ETHICAL HACKING Penetration Testing


What is a penetration test?
Pentest – Penetration test. This is what “white hat hackers” perform, hacking into networks and systems to find vulnerabilities, and then reporting their findings to the company in order to help them improve their security.
Pivoting – Moving from one “owned” box on a network to attack others, in an attempt to “own” the entire network. Meterpreter can be used to do this very well.
Programming Languages – Structured languages that can be compiled into a program. Coding knowledge is essential to cracking software and creating exploits, etc – especially scripting ability in a language like perl. Other common languages include c/c++, Java, C#, F#, VB, Haskell, Scala, D, PHP, SQL, HTML (not actually a programming language), javascript, python, ruby, etc.

What is penetration testing? Penetration testing, often called “pentesting”,“pen testing”, or “security testing”, is the practice of attacking your own or your clients’ IT systems in the same way a hacker would to identify security holes. Of course, you do this without actually harming the network. The person carrying out a penetration test is called a penetration tester or pentester.

Let’s make one thing crystal clear: Penetration testing requires that you get permission from the person who owns the system. Otherwise, you would be hacking the system, which is illegal in most countries – and trust me, you don’t look good in an orange jump suit.

In other words: The difference between penetration testing and hacking is whether you have the system owner’s permission. If you want to do a penetration test on someone else's system, we highly recommend that you get written permission. In this case, asking first is definitely better than apologizing later!

You can become a penetration tester at home by testing your own server and later make a career out of it. At Rapid7, we have a team of professionals that pentest government and enterprise IT systems for a living. And let me tell you, they enjoy their job!


What is a vulnerability?

A vulnerability is a security hole in a piece of software, hardware or operating system that provides a potential angle to attack the system. A vulnerability can be as simple as weak passwords or as complex as buffer overflows or SQL injection vulnerabilities.

To test if you have any vulnerabilities in your systems, you typically use a vulnerability management solution, also known as a vulnerability scanner or vulnerability assessment solution. If you would like to get your hands on a free vulnerability scanner, try NeXpose Community Edition, one of Metasploit’s sister projects.

What is security research?

Vulnerabilities are typically found by security researchers, which is a posh term for smart people who like to find flaws in systems and break them. At Rapid7, we have a team of vulnerability researchers that do nothing else all day. Trust us, this can be a lot of fun.

Like penetration testing, security research can be used for good and evil. Some countries don’t make the distinction and outlaw security research completely, so make sure you check your country’s legislation before you start researching and especially before you publish any research.

What is an exploit?

To take advantage of a vulnerability, you often need an exploit, a small and highly specialized computer program whose only reason of being is to take advantage of a specific vulnerability and to provide access to a computer system. Exploits often deliver a payload to the target system to grant the attacker access to the system.

The Metasploit Project host the world’s largest public database of quality-assured exploits. Have a look at our exploit database – it’s right here on the site.

Even the name Metasploit comes from the term “exploit”. Metasploit was the first software to provide a common framework for a large selection of exploits. Think of it as an abstraction layer (“Meta”) for exploits (abbreviated “sploits”). Get it?

What is a payload?

A payload is the piece of software that lets you control a computer system after it’s been exploited. The payload is typically attached to and delivered by the exploit. Just imagine an exploit that carries the payload in its backpack when it breaks into the system and then leaves the backpack there. Yes, it’s a corny description, but you get the picture.

Metasploit’s most popular payload is called Meterpreter, which enables you to do all sorts of funky stuff on the target system. For example, you can upload and download files from the system, take screenshots, and collect password hashes. You can even take over the screen, mouse, and keyboard to fully control the computer. If you’re feeling particularly bad-ass, you can even turn on a laptop’s webcam and be a fly on the wall.

Thursday, 28 August 2014

Network Security Tools

11 tools

(6) ★★★★½ Metasploit

Metasploit took the security world by storm when it was released in 2004. It is an advanced open-source platform for developing, testing, and using exploit code. The extensible model through which payloads, encoders, no-op generators, and exploits can be integrated has made it possible to use the Metasploit Framework as an outlet for cutting-edge exploitation research. It ships with hundreds of exploits, as you can see in their list of modules. This makes writing your own exploits easier, and it certainly beats scouring the darkest corners of the Internet for illicit shellcode of dubious quality. One free extra is Metasploitable, an intentionally insecure Linux virtual machine you can use for testing Metasploit and other exploitation tools without hitting live servers.
Metasploit was completely free, but the project was acquired by Rapid7 in 2009 and it soon sprouted commercial variants. The Framework itself is still free and open source, but they now also offer a free-but-limited Community edition, a more advanced Express edition ($3,000 per year per user), and a full-featured Pro edition ($15,000 per user per year). Other paid exploitation tools to consider are Core Impact (more expensive) and Canvas (less).
The Metasploit Framework now includes an official Java-based GUI and also Raphael Mudge's excellent Armitage. The Community, Express, and Pro editions have web-based GUIs. Read 10 reviews.
Latest release: version 4.9 on March 26, 2014 (5 months ago).

  ★★★½ w3af

W3af is an extremely popular, powerful, and flexible framework for finding and exploiting web application vulnerabilities. It is easy to use and extend and features dozens of web assessment and exploitation plugins. In some ways it is like a web-focused Metasploit. Read 15 reviews.
Latest release: version 1.1 on Oct. 11, 2011 (2 years, 10 months ago).

(4) ★★★★½ Core Impact

Core Impact isn't cheap (be prepared to spend at least $30,000), but it is widely considered to be the most powerful exploitation tool available. It sports a large, regularly updated database of professional exploits, and can do neat tricks like exploiting one machine and then establishing an encrypted tunnel through that machine to reach and exploit other boxes. Other good options include Metasploit and Canvas. Read 5 reviews.
Latest release: version 12 on Aug. 8, 2011 (3 years ago).

(7) ★★★★½ sqlmap

sqlmap is an open source penetration testing tool that automates the process of detecting and exploiting SQL injection flaws and taking over of back-end database servers. It comes with a broad range of features, from database fingerprinting to fetching data from the DB and even accessing the underlying file system and executing OS commands via out-of-band connections. The authors recommend using the development release from their Subversion repository. Read 9 reviews.
Latest release: version 0.9 on April 11, 2011 (3 years, 4 months ago).

(1) ★★★★★ Canvas

Canvas is a commercial vulnerability exploitation tool from Dave Aitel's ImmunitySec. It includes more than 370 exploits and is less expensive than Core Impact or the commercial versions of Metasploit. It comes with full source code, and occasionally even includes zero-day exploits. Read 1 review.
Latest release: version 6.73 on Oct. 26, 2011 (2 years, 10 months ago).

(58) ★★★★★ Social Engineer Toolkit

The Social Engineer Toolkit incorporates many useful social-engineering attacks all in one interface. The main purpose of SET is to automate and improve on many of the social-engineering attacks out there. It can automatically generate exploit-hiding web pages or email messages, and can use Metasploit payloads to, for example, connect back with a shell once the page is opened. Read 73 reviews.

no rating sqlninja

sqlininja exploits web applications that use Microsoft SQL Server as a database backend. Its focus is on getting a running shell on the remote host. sqlninja doesn't find an SQL injection in the first place, but automates the exploitation process once one has been discovered. Review this tool.
Latest release: version 0.2.6-r1 on April 29, 2012 (2 years, 4 months ago).

(4) ★★★★★ Netsparker

Netsparker is a web application security scanner, with support for both detection and exploitation of vulnerabilities. It aims to be false positive–free by only reporting confirmed vulnerabilities after successfully exploiting or otherwise testing them. Read 4 reviews.
Latest release: version 1.8.3.3 on Feb. 10, 2011 (3 years, 6 months ago).

no rating BeEF (#77, new!)

BeEF is a browser exploitation framework. This tool will demonstrate the collecting of zombie browsers and browser vulnerabilities in real-time. It provides a command and control interface which facilitates the targeting of individual or groups of zombie browsers. It is designed to make the creation of new exploit modules easy. Read 3 reviews.
Latest release: version 0.4.5.0 on April 25, 2014 (4 months ago).

no rating dradis

dradis is an open source framework to enable effective sharing of information among participants in a penetration test. It is a self-contained web application that provides a centralised repository of information to keep track of what has been done so far, and what is still ahead. It has plugins to read and collect the output of a variety of network scanning tools, like Nmap, Burp Suite, and Nikto. Review this tool.
Latest release: version 2.6.1 on Feb. 11, 2011 (3 years, 6 months ago).

(1) ★★★★★ WebGoat

WebGoat is a deliberately insecure J2EE web application maintained by OWASP designed to teach web application security lessons. In each lesson, users must demonstrate their understanding of a security issue by exploiting a real vulnerability in the WebGoat application. For example, in one of the lessons the user must use SQL injection to steal fake credit card numbers. The application is a realistic teaching environment, providing users with hints and code to further explain the lesson. Read 1 review.
Latest release: version 5.3 RC1 on Nov. 1, 2009 (4 years, 10 months ago).
11 tools

Hacking Wifi

Wifite : Hacking Wifi The Easiest Way : Kali Linux Tutorial


  • Securities
  • Popular Posts
  • How to insta

Wifite

While the aircrack-ng suite is a well known name in the wireless hacking , the same can't be said about Wifite. Living in the shade of the greatness of established aircrack-ng suite, Wifite has finally made a mark in a field where aircrack-ng failed. It made wifi hacking everyone's piece of cake. While all its features are not independent (eg. it hacks WPS using reaver), it does what it promises, and puts hacking on autopilot. I'm listing some features, before I tell you how to use wifite (which I don't think is necessary at all, as anyone who can understand simple English instructions given by Wifite can use it on his own).

Features Of Wifite

  • Sorts targets by signal strength (in dB); cracks closest access points first
  • Automatically de-authenticates clients of hidden networks to reveal SSIDs
  • Numerous filters to specify exactly what to attack (wep/wpa/both, above certain signal strengths, channels, etc)
  • Customizable settings (timeouts, packets/sec, etc)
  • "Anonymous" feature; changes MAC to a random address before attacking, then changes back when attacks are complete
  • All captured WPA handshakes are backed up to wifite.py's current directory
  • Smart WPA de-authentication; cycles between all clients and broadcast deauths
  • Stop any attack with Ctrl+C, with options to continue, move onto next target, skip to cracking, or exit
  • Displays session summary at exit; shows any cracked keys
  • All passwords saved to cracked.txt
  • Built-in updater./wifite.py -upgrade

I find it worth mentioning here, that not only does it hack wifi the easy way, it also hack in the best possible way.  For example, when you are hacking a WEP wifi using Wifite, it uses fakeauth and uses the ARP method to speed up data packets (I wrote a full length post about something which it does automatically!).

Hacking WEP network

If you've followed my previous posts on Hacking Wifi (WEP), you know there's a lot of homework you have to do before you even start hacking. But not here. With Wifite, its as easy and simple as a single command.
wifite -wep
You might even have used the command
wifite
If you see any error at this stage move to the bottom of the page for troubleshooting tips. If your issue is not listed please comment. We reply within a day.
The -wep makes it clear to wifite that you want to hack WEP wifis only. It'll scan the networks for you, and when you think it has scanned enough, you can tell it to stop by typing ctrl+c. It'll then ask you which wifi to hack. In my case, I didn't specify -wep so it shows all the wifis in range.
 You can also select all and then go take a nap (or maybe go to sleep). When you wake up, you might be hacking all the wifi passwords in front of you. I typed one and it had gathered 7000 IVs (data packets) within 5 mins. Basically you can except it to hack the wifi in 10 mins approx. Notice how it automatically did the fake auth and ARP replay.
Here are a few more screenshots of the working of Wifite, from their official website (./wifite.py is not something that should bother you. You can stick with the simple wifite. Also, specifying the channel is optional so even the -c 6 was unnecessary. Notice that instead of ARP replay, the fragmentation attack was used, using -frag) -

 Hacking WPS wasn't fast (it took hours), but it was easy and didn't require you to do anything but wait.
 Note, the limitation that many reader on my blog are beginners forbid me from introducing too many attacks. I made a tutorial about ARP replay attack, and that too was detailed as hell. However, Wifite makes it possible for you to use any method that you want to use, by just naming it. As you saw in the screenshot above, the fragmentation attack was carried out just by typing -frag. Similarly, many other attacks can be played with. A good idea would be to execute the following-
wifite -help
This will tell you about the common usage commands, which will be very useful. Here is the list of WEP commands for different attacks-
    WEP
-wep         only target WEP networks [off]
-pps <num>   set the number of packets per second to inject [600]
-wept <sec>  sec to wait for each attack, 0 implies endless [600]
-chopchop    use chopchop attack      [on]
-arpreplay   use arpreplay attack     [on]
-fragment    use fragmentation attack [on]
-caffelatte  use caffe-latte attack   [on]
-p0841       use -p0841 attack        [on]
-hirte       use hirte (cfrag) attack [on]
-nofakeauth  stop attack if fake authentication fails    [off]
-wepca <n>   start cracking when number of ivs surpass n [10000]
-wepsave     save a copy of .cap files to this directory [off]
As you can see, its the same thing as is there on the help screenshot. Play around with the attacks and see what you can do. Hacking WPA without WPS wouldn't be that easy, and while I don't usually do this, I'm providing a link to an external website for the tutorial . This is the best WPA cracking tutorial I've seen, and I can't write a better one. It's highly detailed, and I'm just hoping I don't lose my audience to that website. Here is the tutorial - Cracking Wifi WPA/WPA2 passwords using pyrit cowpatty in Kali Linux

Troubleshooting

Wifite quits unexpectedly, sating "Scanning for wireless devices. No wireless interfaces were found. You need to plug in a wifi device or install drivers. Quitting."
You are using Kali inside a virtual machine most probably. Virtual machine does not support internal wireless card. Either buy an external wireless card, or do a live boot / side boot with Windows. Anything other than Virtual machine in general.